 Merry, Merry! It's hard to believe that Christmas is a week away! My shopping isn't quite done but I couldn't resist a few Christmas projects in the meantime. I just love a well decorated home for the holidays. Fortunately, with Thanksgiving a little early this year, I had an extra week to make it happen. (and I was also off from work that week! Yay!) Here are the first of my many projects!
There are four types of home-made ornaments in this post: painted glass, glittered glass, glittered monogram and a kid-friendly version using plastic ornaments. These ideas would work well for a craft party with friends and neighbors or even as a fun family tradition each year.
Painted Glass Ornaments
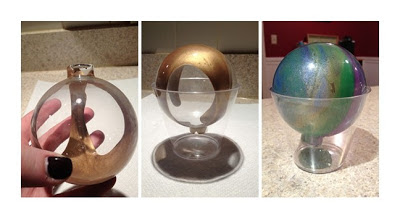
These look cool, right? The blue one was my favorite... it had a peacock color palate of turquoise, pine, purple and a touch of gold. Super easy but I will warn you up front: the paint you choose matters a great deal! I thought I was going all high end by choosing Martha Stewart acrylic paints but that was problematic. And for those of you who know me well, I LOVE Martha Stewart! So it pains me to advise you against her paint for this project. The problem was that the paint was too thick and it covered well but took FOREVER to coat the inside of the ornaments, let alone dry inside of them. I tried diluting the paint a bit but that created a whole host of new problems with drying times. All this to say, don't splurge here. Get the 89 cent craft paint and be done.
1- package glass ornaments (set of four)
3- bottles of acrylic craft paint (different colors)
1- spool of wired ribbon in the color of your choice
1- box ornament hangers (or you could use thin ribbon as an alternative)
Begin by taking your first color and adding it to the inside lip of the ornament, drop by drop. To get a cool marbling effect, tilt the ornament to allow the paint to run in different directions. For the vertical marbling, turn the ornament so the paint runs from top to bottom and then bottom to top. Allow the excess paint to drain from the ornament using a disposable cup. Repeat using the other colors until the inside of the ornament is completely covered with paint. Invert the ornament and allow the excess paint to drain in a disposable cup at least overnight. The "streaking" will occur as the paint drains and dries.
Check to see if the ornament is dry the next day... thicker paint will take several days! (which is why you need to avoid the Martha brand. Mine were drying for the better part of a week!) When the paint is dry, insert the metal piece and tie a corresponding colored wire ribbon around the metal piece. Your ornament is ready to go on your tree or gifted to someone. :)
I love the look of glittered ornaments but so many varieties get glitter all over your house. So I had the idea to coat the inside of an ornament with the glitter instead. This was really easy. It just took a while to dry like the painted ornaments above.
1- package glass ornaments (set of four)
1- bottle of Martha Stewart Glitter (I have the 24 mini pack)
1- spool of wired ribbon in the color of your choice
1- bottle of elmers glue
ornament hangers
Begin by adding the glue drop by drop into the ornament and swirling around to coat. You want to coat the entire inside of the ornament and then drain the glue for 30 minutes. It is imperative to remove as much excess glue as possible or the glitter will drain out of the ornament during drying time and it won't coat correctly. I chose the Martha Stewart Golden Beryl glitter and used about 1/4 of the container pictured above. If you buy a larger bottle you'll be able to make over a dozen of these ornaments very easily.
Once the glue has drained well and a very thin coat of glue still remains inside the ornament, funnel glitter in like the picture above. (I used some wax paper to make the funnel.) Turn the ornament around to coat the glue with glitter. Add more glitter, if needed. Place the ornament in a plastic cup to allow the glue to dry. It should dry overnight. Insert the metal hook and tie a ribbon around the base and you are done!
1- package glass ornaments (set of four)
1- bottle of Martha Stewart Glitter (I have the 24 mini pack)
1- spool of wired ribbon
1- bottle of acrylic paint
ornament hangers
Using wax paper to make a small funnel, I poured about 1/4 of the small bottle of glitter into the ornament and placed the metal hook on top. That was it! Propping the ornament in the disposable cup, I handpainted our monogram onto the outside and allowed it to dry overnight. Tie a ribbon around the metal piece and you are done!
And they are not just for kids! I've made these with several ladies at a Christmas Craft Night a few years ago. Even people who aren't crafty can do this and they will look great!
1- package of plastic, clear ornaments
1- spool of silver, gold or multi-colored star garland
1- spool of wired ribbon
glitter glue tubes
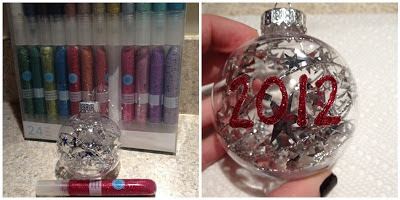
Begin by pushing about 12 inches of star garland into the inside of the plastic ornament. Insert the metal hook inside and start glitter gluing the outside. I love the idea of adding the year to these, especially if the kids make them.
Prop the ornament in a plastic cup. Or- if you have a place to hang it by the ornament hanger, even better! Add some ribbon once it's dried and you have a very cute, inexpensive ornament to give to a grandparent, aunt, uncle or to keep for yourself!
Happy Christmas Crafting from the CC workshop. :)
Check to see if the ornament is dry the next day... thicker paint will take several days! (which is why you need to avoid the Martha brand. Mine were drying for the better part of a week!) When the paint is dry, insert the metal piece and tie a corresponding colored wire ribbon around the metal piece. Your ornament is ready to go on your tree or gifted to someone. :)
Glittered Glass Ornaments
I love the look of glittered ornaments but so many varieties get glitter all over your house. So I had the idea to coat the inside of an ornament with the glitter instead. This was really easy. It just took a while to dry like the painted ornaments above.
1- package glass ornaments (set of four)
1- bottle of Martha Stewart Glitter (I have the 24 mini pack)
1- spool of wired ribbon in the color of your choice
1- bottle of elmers glue
ornament hangers
Begin by adding the glue drop by drop into the ornament and swirling around to coat. You want to coat the entire inside of the ornament and then drain the glue for 30 minutes. It is imperative to remove as much excess glue as possible or the glitter will drain out of the ornament during drying time and it won't coat correctly. I chose the Martha Stewart Golden Beryl glitter and used about 1/4 of the container pictured above. If you buy a larger bottle you'll be able to make over a dozen of these ornaments very easily.
Once the glue has drained well and a very thin coat of glue still remains inside the ornament, funnel glitter in like the picture above. (I used some wax paper to make the funnel.) Turn the ornament around to coat the glue with glitter. Add more glitter, if needed. Place the ornament in a plastic cup to allow the glue to dry. It should dry overnight. Insert the metal hook and tie a ribbon around the base and you are done!
Glittered Monogram Ornaments
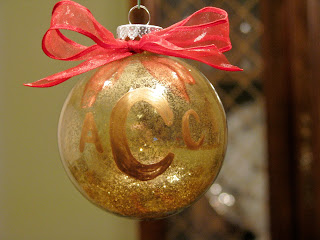
I wanted something with a little flair but still easy to make. These were quick and they look so cute on the tree! The glitter inside sparkles like crazy. :)1- package glass ornaments (set of four)
1- bottle of Martha Stewart Glitter (I have the 24 mini pack)
1- spool of wired ribbon
1- bottle of acrylic paint
ornament hangers
Using wax paper to make a small funnel, I poured about 1/4 of the small bottle of glitter into the ornament and placed the metal hook on top. That was it! Propping the ornament in the disposable cup, I handpainted our monogram onto the outside and allowed it to dry overnight. Tie a ribbon around the metal piece and you are done!
Star-Garland Ornaments (Kid Friendly!)
I've made these with two of our youth groups over the years and they always are a big hit! The really nice thing about this craft is that you can't mess it up and the ornaments won't shatter even if kids drop them. They are easy to make, decorate and the kids love that they made something for your tree.And they are not just for kids! I've made these with several ladies at a Christmas Craft Night a few years ago. Even people who aren't crafty can do this and they will look great!
1- package of plastic, clear ornaments
1- spool of silver, gold or multi-colored star garland
1- spool of wired ribbon
glitter glue tubes
Begin by pushing about 12 inches of star garland into the inside of the plastic ornament. Insert the metal hook inside and start glitter gluing the outside. I love the idea of adding the year to these, especially if the kids make them.
Prop the ornament in a plastic cup. Or- if you have a place to hang it by the ornament hanger, even better! Add some ribbon once it's dried and you have a very cute, inexpensive ornament to give to a grandparent, aunt, uncle or to keep for yourself!
Happy Christmas Crafting from the CC workshop. :)


No comments:
Post a Comment
Comments are moderated so it may take a little while for your comment to show up.